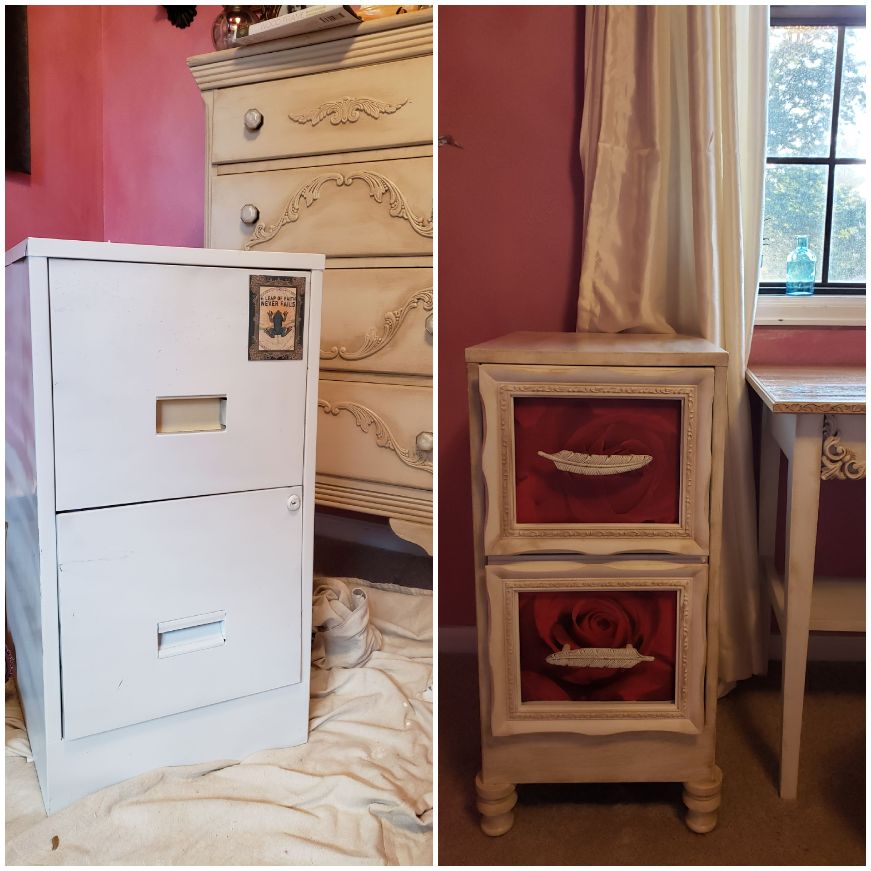
Part of embracing the creatively retired life is getting organized, or at least pretending to. We’re talking about purging, cleaning, and turning our clutter into something that resembles Pinterest-worthy perfection. So, let’s dive into this adventure with the enthusiasm of a toddler in a ball pit!
Let’s address the elephant in the room—or should I say, the overstuffed file cabinet that’s been lurking in the corner since the dawn of time. You know the one. It’s filled with relics like your lease from the disco era, and more bank statements than you can shake a shredder at.
But fear not, intrepid organizer! We’re about to Marie Kondo this chaos faster than you can say, “Does this spark joy?” Grab your trusty shredder and let’s make some confetti out of those ancient documents. Pro tip: Don’t toss them just yet. We’re about to have some arts and crafts fun later. Into the closet they go, nestled among forgotten sweaters and that box of cables you swear you’ll need someday.
Now, off to the craft store we go, armed with a shopping list that would make even Martha Stewart proud.
Degreaser? Check. Chalk paint? Check. Picture frames? Check, and maybe a few extra for good measure. And let’s not forget the pièce de résistance—fancy handles because why settle for basic when you can have fabulous?
Back home, it’s time to roll up our sleeves and transform that file cabinet from eyesore to eye-catching. But first, let’s document this journey with a dramatic before picture. Cue the sad violin music as we bid adieu to the grime and grease with a vigorous scrub-down worthy of an Olympic sport.
With the grace of a DIY guru and the determination of a contestant on “The Great British Bake Off,” we attach the feet, slap on some chalk paint, and adorn the drawers with wallpaper like a seasoned interior designer on a caffeine high.
As we wait for the paint to dry (cue the obligatory tea break or cocktail hour, your choice), we marvel at our handiwork. Who knew organizing could be this exhilarating?
Once everything is dry, it’s time for the finishing touches. Wax on, wax off—no, we’re not auditioning for “The Karate Kid,” just buffing our masterpiece to a glorious shine. Add the new handles, step back, and behold the transformation. Voila! You’ve just turned a dusty relic into a work of art worthy of its own exhibit at the MoMA.
But wait, there’s more! Stay tuned for the next installment of DIY adventures, where we tackle an over-the-top ottoman with all the flair of a reality TV star at a red-carpet event. Until then, happy transforming, fellow creatives!
Yours in organized chaos,
Mo
Shopping List
- A degreaser and rags
- Chalk paint in the color of your choice
- Picture frames the dimensions of your drawers. Look for buy one get one. Mine are bisque frames and they cost $18.00 for both!
- Handles – fancy or plain. I prefer fancy. The fancier the better.
- Wallpaper scraps, wrapping paper, or any paper with a print you love that will complement the chalk paint you’ve chosen.
- Glue (Mod Podge or Elmer’s) and E6000 glue, clear
- Clear wax and brown wax.
- 3 paint brushes.
- 4 feet. Bun feet, spindle feet, small hairpin feet – whatever your vision of a prettified file cabinet is.
Step by Step
Step One:
Take a before picture. Remove the drawers, the handles and the lock. With the degreaser, scrub the file cabinet and drawers inside and out. Really put some elbow grease into it. The more degreased the better the paint will stick.
Step Two:
Attach the feet. It’s really simple. Drill a hole in each corner, stick the threaded part of the foot through the hole and put a fastener (nut) on and secure the feet in place. Stand cabinet upright.
Step Three:
Shake the can of chalk paint. Open it and stir it. If you’ve never used chalk paint before I will tell you right now, it is magic. You can paint anything with chalk paint. Metal, wood, glass. Now paint your cabinet and feet.
Step Four:
While the cabinet is drying – takes about an hour – work on the drawers. Apply the paper to the entire front of the drawer. Mod Podge or watered down Elmer’s glue works and if your scrap of wallpaper is pre-pasted, just wet it and stick it on there.
Step Five:
Using E6000, glue the picture frames onto the drawer fronts. If you want, you can paint the frames the color of your cabinet, a complimentary color, leave them as they are. Whatever your creative little heart desires.
Step Six:
Paint a second coat on the cabinet while your drawers dry. Let second coat dry – again, about an hour. Have a cup of tea, or a cocktail, and look proudly at what you’ve done so far. You’re in the home stretch.
Step Seven:
When the file cabinet is dry, paint on the clear wax, covering all of the chalk paint. When the wax dries to tackiness, take a soft rag and buff it to a shine. If you want to add the brown wax to distress parts of it or mimic wood grain, do it now. When the brown wax dries to tackiness, buff it to a shine.
Step Eight:
Add your new handles to the front of the drawers by drilling holes and adding fasteners to the back. If you’ve painted your frames, wax them with clear wax first and distress with the brown wax.
Step Nine:
Put the drawers in the cabinet. Put your thinned out files in. You should have created something that looks a little like this:

